- Dashboard
- Widgets
- AI Diary
- AI Humanizer
- AI Image
- Audio Editor
- Base64 / URL Encoder
- Calendar
- Canvas
- Collection
- Color Picker
- Container
- Countdown Timer
- Currency Converter
- Daily Quiz
- Daily Quote
- Daily Riddle
- Date & Time
- Embed
- GitHub Releases
- Google Calendar
- Habit Tracker
- Hacker News
- Image Compression
- IP Info
- JSON Formatter
- Links
- Markdown Editor
- News
- News Summary
- Notes
- Photo Frame
- Podcast
- Pomodoro Timer
- Product Hunt
- QR Code Generator
- Quick Answer
- Quick Note
- Regex Tester
- RSS Feed
- Search
- Spacer
- Stopwatch
- Story Snippet
- Stripe Sales
- Subreddit
- Substack
- t0ggles Focus
- t0ggles My Boards
- t0ggles My Tasks
- Tasks
- Text Diff
- Todo
- TradingView Advanced Chart
- TradingView Market Summary
- TradingView Mini Chart
- TradingView Symbol Overview
- TradingView Ticker Tape
- Translation
- Unit Converter
- Uptime Monitor
- Weather
- What If
- World Clock
- YouTube Channel
- Teams
Teams and Workspaces
A team lets a group of people share one dashboard. Everyone opens the same pages and widgets, editors keep them up to date, and the team pays per seat instead of per person's plan.
#Teams and Workspaces
A team is the group of people and the subscription. A workspace is a shared dashboard inside the team. It has its own pages, widgets, theme, and wallpaper, just like your personal dashboard.
A team can have as many workspaces as it needs, for example one for the whole company and one for each department. Every member sees the workspaces they have been given access to in the avatar menu.
Your personal dashboard does not change when you join or create a team. Nobody in the team can see it, and the team plan does not change what your personal account can do.
#Creating a Team
You can start a team from the pricing panel, whether or not you already use Start Page HQ:
- Open the pricing section on the website, or the plan chooser you see after signing up.
- In the Premium panel, switch from Personal to Team.
- Set the number of seats you need (minimum 2) and pick Monthly or Annual billing.
- Click Start Team and complete the payment. If you are not signed in yet, you are asked to sign in first and then taken straight to the checkout.
- Back on the dashboard, the setup wizard opens in your new team's first workspace and asks for the team name. Then it helps you add pages and widgets.
You do not need a personal paid plan to own a team. The team plan covers the team's workspaces only: your own dashboard stays on whatever plan it is on, free or paid.
If you already have an account, you can also click your avatar and choose Create a team. That dialog asks for the name, the number of seats (minimum 2), and the billing cadence up front. Read the Billing section for how the seat count changes as you invite people.
The iOS and Mac apps can join teams and switch between workspaces, but a team has to be bought on the website or in the Chrome or Firefox extension.
#Switching Between Personal and Team
Click your avatar to open the menu. Under your name you will see Personal and, below it, every team you belong to with its workspaces. Click a workspace to switch to it, or Personal to go back to your own dashboard.
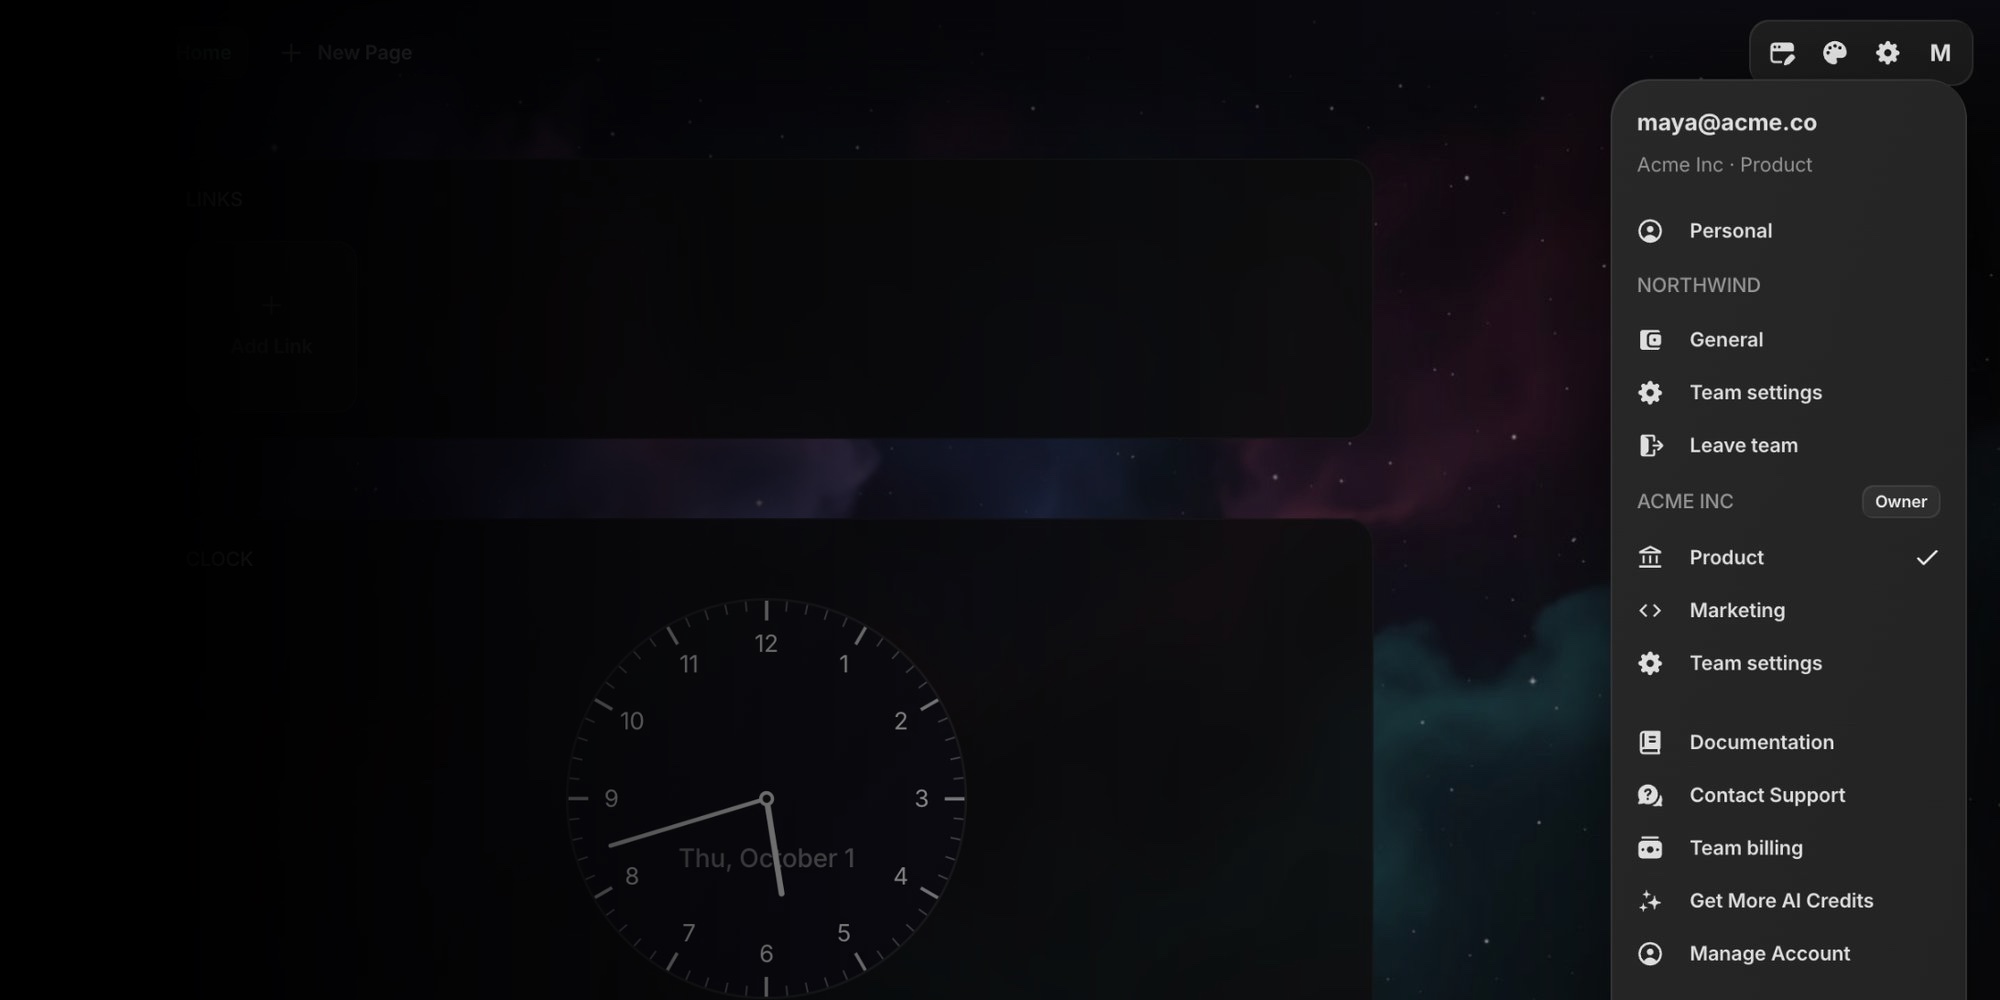
The active workspace is remembered, so the next tab you open lands in the same place. The switch works everywhere you are signed in: the web app and every browser extension.
#Managing Workspaces
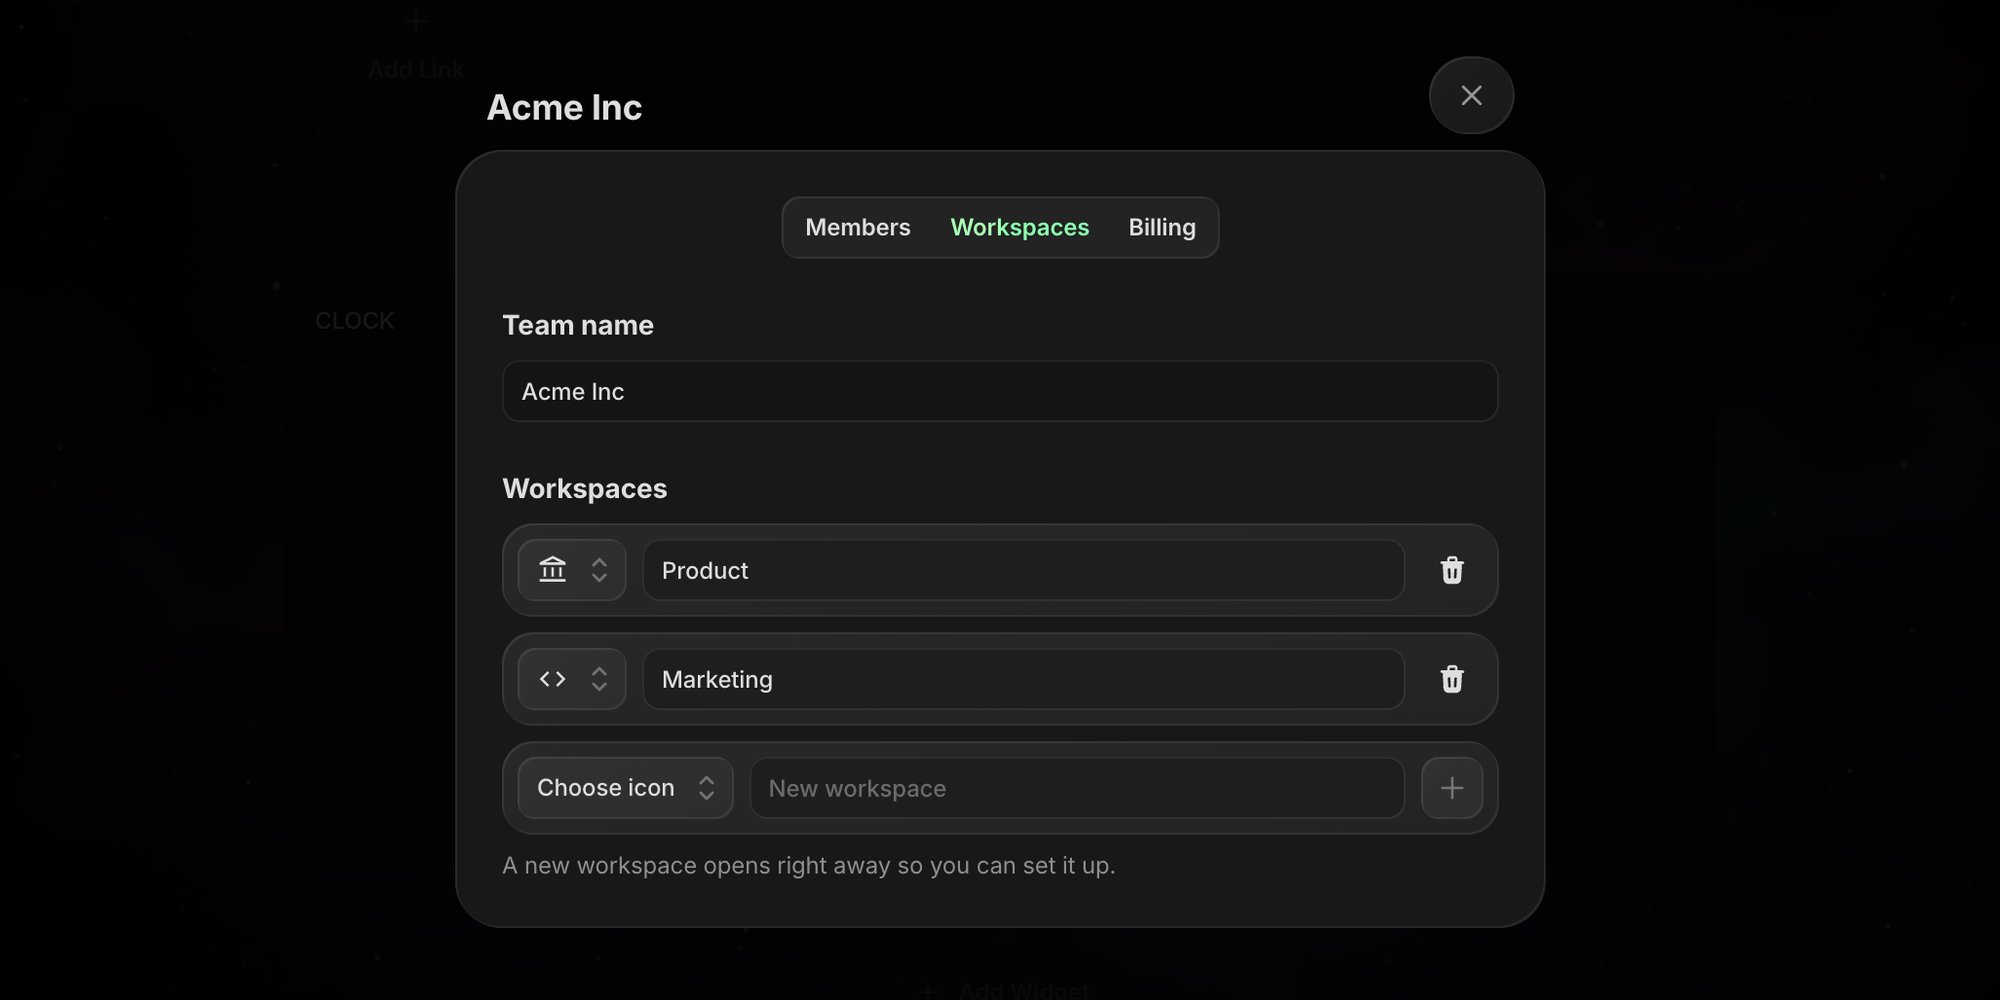
Owners and admins can open Team settings from the avatar menu. The Workspaces tab lets you:
- Add a workspace with the New workspace row. You are switched into it right away.
- Rename a workspace by editing its name. Press Enter or click away to save.
- Change the icon shown in the avatar menu.
- Delete a workspace and everything in it. Type DELETE to confirm. The last workspace of a team cannot be deleted; delete the team instead.
#Inviting People
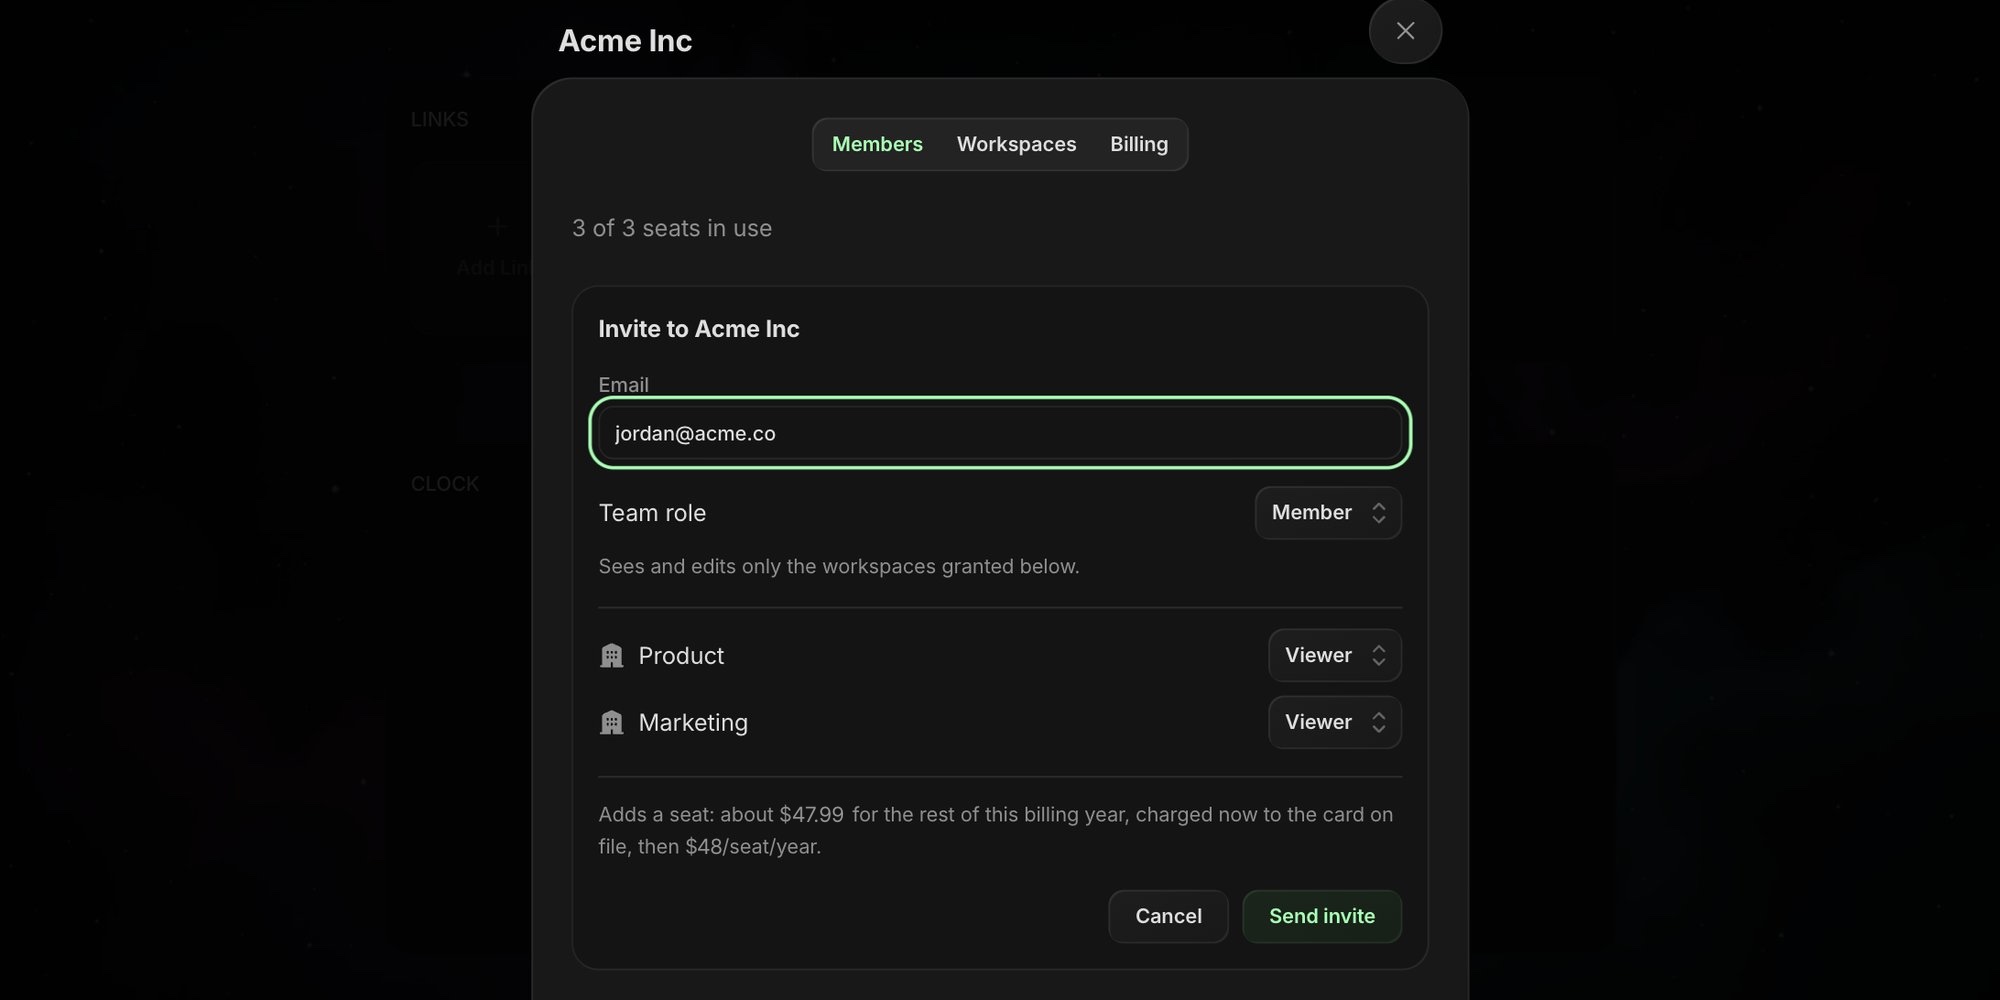
- Open Team settings from the avatar menu and go to the Members tab.
- Click Invite.
- Enter the person's email address.
- Choose a team role: Member or Admin.
- For a member, choose Editor, Viewer, or No access for each workspace. Admins can edit every workspace, so there is nothing to choose for them.
- Click Send invite.
The person receives an email with a link. The link works for 14 days and only for the address you sent it to. If they do not have a Start Page HQ account yet, the link asks them to sign in with that address, which creates one.
Pending invites are listed under the members. For each one you can copy the invite link to send it another way, resend the email (which also restarts the 14-day window), or revoke it. Inviting the same address again sends a fresh link and cancels the old one.
The person who sent the invite gets an email when it is accepted or declined.
#Roles
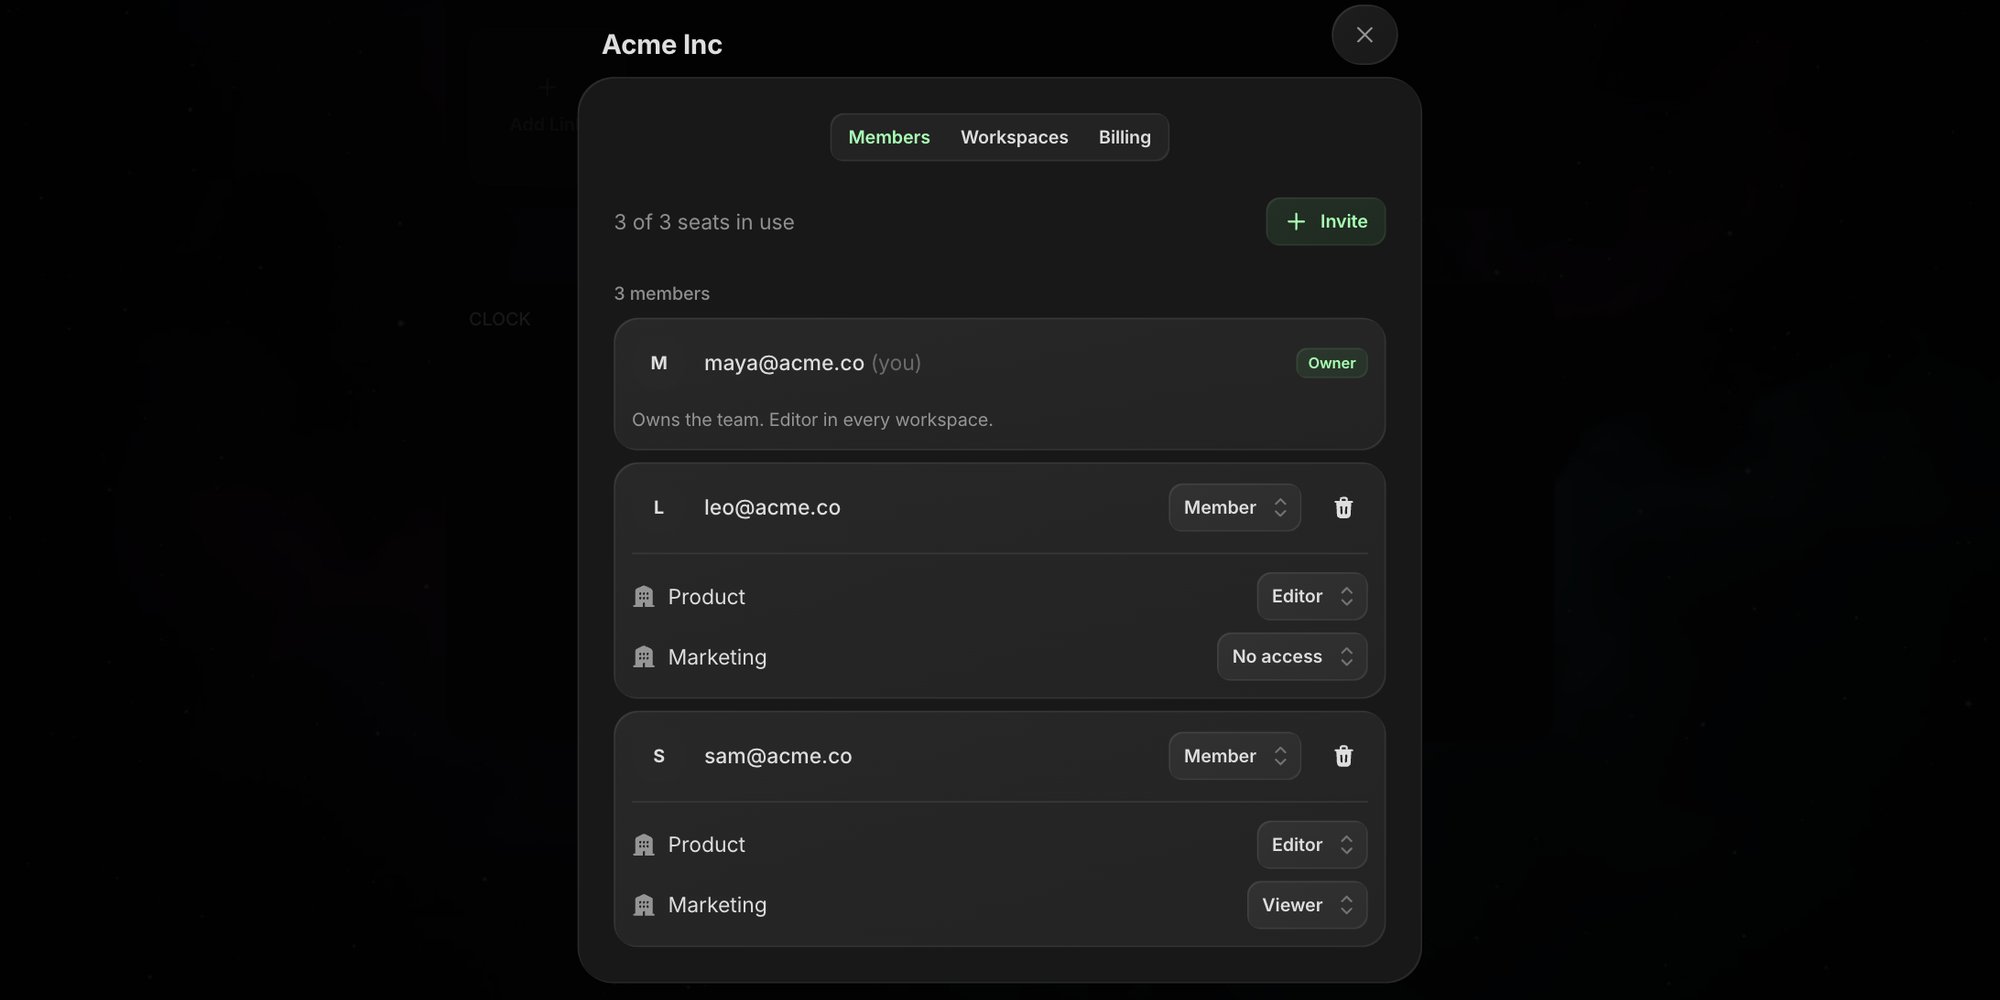
There are two kinds of roles. Team roles decide who runs the team. Workspace roles decide who can change what is on a dashboard.
#Team Roles
| Role | What they can do |
|---|---|
| Owner | Everything an admin can do, plus billing, transferring ownership, and deleting the team. The person who created the team. There is one owner. |
| Admin | Invite and remove people, change roles, add, rename, and delete workspaces. Admins are editors in every workspace. |
| Member | Only what their workspace roles allow. A member with no workspace access sees the team in the menu but cannot open anything. |
#Workspace Roles
| Role | What they can do |
|---|---|
| Editor | Add, change, rearrange, and delete pages and widgets. Change the theme, wallpaper, and layout. Upload files, connect apps, use AI credits, and share pages publicly. |
| Viewer | Open and read everything. Viewers cannot change or save anything, but they can still use widgets locally, for example tick a todo or start a timer. Nothing is saved. |
Owners and admins are editors in every workspace automatically.
#Changing Roles
Owners and admins change roles from the Members tab. Each member row has a team role selector and, for members, an access selector for every workspace. Changes apply immediately.
To remove someone from the team, click the remove button on their row and confirm. Their seat is freed right away.
#Editing Together
Everything in a workspace is shared. When an editor changes a widget, everyone sees the change the next time they open a tab or return to the dashboard.
If two people edit the same widget at the same time, the second save is refused and the widget shows the latest version instead of overwriting the first person's work. A short message tells you what happened. Make your change again on top of the current version.
Widgets that connect to other services, such as Google Calendar, Stripe, or t0ggles, are connected by an editor using their own account. The connection belongs to the workspace, so the widget keeps working if that person later leaves the team.
#AI Credits
Each team has its own pool of AI credits. Every seat adds 500 credits a month on the monthly plan or 5,000 a year on the annual plan, refilled on each renewal.
The pool follows the seats you pay for. A seat added during a billing period brings its share of credits for the rest of that period. A seat that comes off the plan takes nothing back, since it is not refunded either. Credit packs the owner bought are never taken back.
AI widgets used inside a workspace draw from the team pool, never from anyone's personal balance. You can see the pool under Get More AI Credits in the avatar menu while a workspace is active. The owner can buy extra credit packs for the team from the same place.
#Billing
Teams are billed per seat: $4 per seat per month or $40 per seat per year, with a minimum of 2 seats. There is no lifetime plan for teams.
A seat is a member or a pending invite. The seats you choose at checkout stay on the plan, and invites fill them first. Past those, the seat count follows your team automatically:
- Sending an invite when every paid seat is taken adds a seat for the rest of the current period. On the annual plan it is charged right away. On the monthly plan it is added to your next invoice. The invite form shows the amount before you send it.
- Revoking an invite, removing a member, a member leaving, or an invitee declining frees a seat. A seat beyond the ones you bought comes off the plan from the next invoice. The current period is not refunded.
- An invite nobody accepts expires after 14 days and frees its seat the same way.
- Accepting an invite changes nothing, because the seat was already counted when the invite was sent.
Bought more seats than you use? The owner can drop the empty ones from Billing with Remove unused seats. The next invoice bills the lower count, and the current period is not refunded.
The owner manages billing from Team settings under Billing, or from Team billing in the avatar menu while a workspace is active. There you can see the current plan, seat count, and renewal date, and open Manage billing to update the card, view invoices, or cancel.
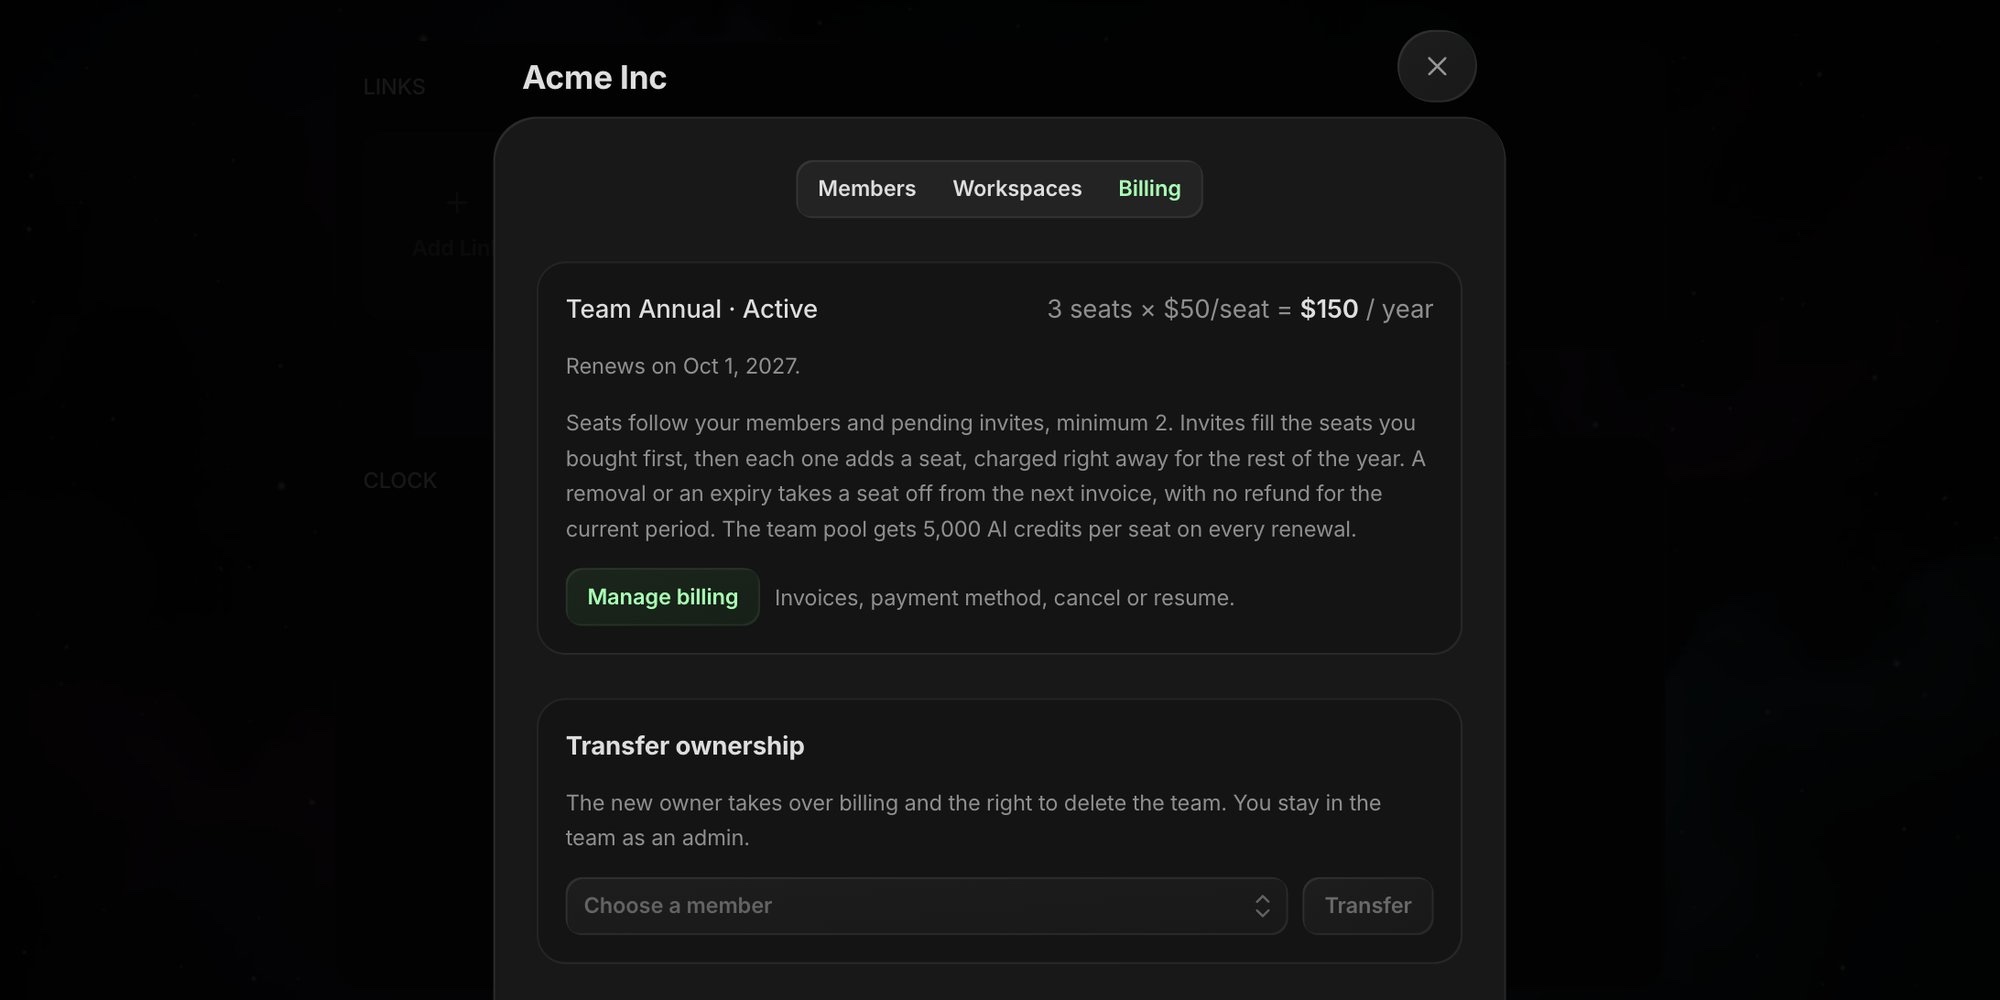
On the monthly plan, Switch to annual in Billing moves the team to yearly billing right away. You pay the annual price for your current seats today, minus credit for the unused part of the month, the plan renews yearly from that day, and the team pool rises to the annual amount.
#Canceling
When you cancel, every member keeps full access until the end of the paid period. After that every workspace becomes read-only: people can open and read them, and export from them, but not edit. Feeds stop updating and any public shares stop working.
Changed your mind before the period ends? Open Manage billing and resume the subscription. Nothing changes for the team.
Nothing in a team is ever deleted or trimmed, however long it stays inactive. To reactivate, the owner opens Team settings, picks a plan under Billing, and clicks Reactivate team. Everyone is back where they were.
#Leaving a Team
Any member or admin can leave from the avatar menu by clicking Leave team under the team's name. You keep your personal dashboard and lose access to the team's workspaces.
The owner cannot leave. To hand the team to someone else, open Team settings, go to Billing, and use Transfer ownership. The new owner must already be a member. You become an admin.
#Deleting a Team
Only the owner can delete a team, from the Billing tab in Team settings. Deleting a team cancels the subscription immediately and removes every workspace with all its pages, widgets, and uploads. Type DELETE to confirm. Members' personal dashboards are not affected.